How To Trim Sails: The Ultimate Guide (with Cheat Sheet)
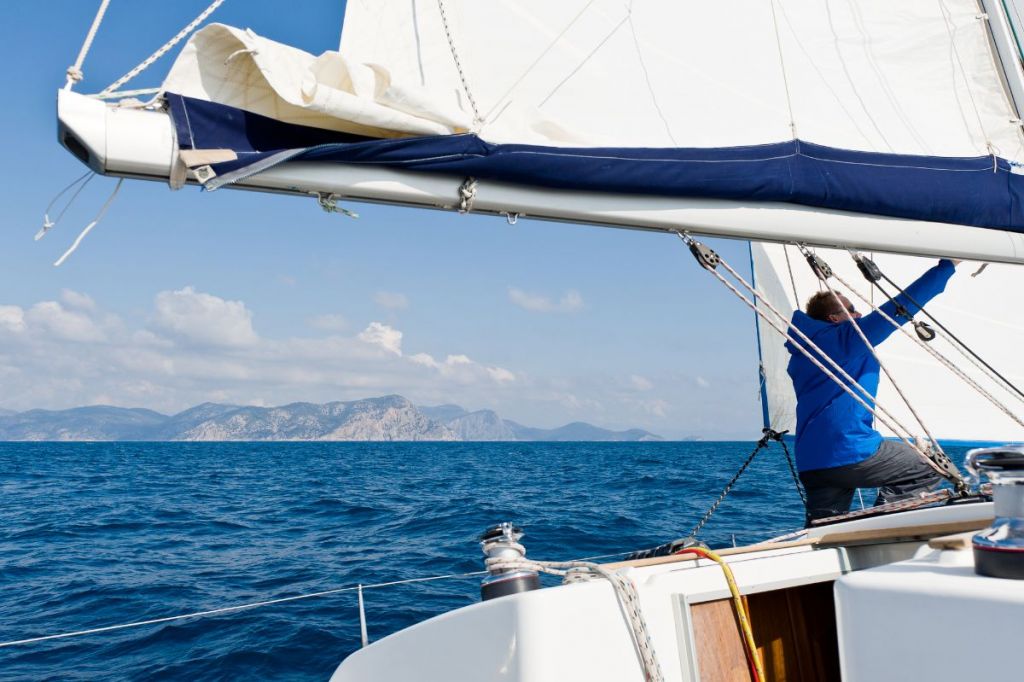
Experienced sailors pull and ease lines, move blocks, and tighten or loosen various controls as the boat turns and the wind shifts. They're constantly fiddling with sail controls, especially racers. But even a brand new sailor can get out there and make the boat move somewhere. So what's with all the fiddling?
Expert sailors know how to get more out of their boat with good sail trim. When you trim your sails, you get them to the optimal shape to provide the most driving force for the wind conditions and point of sail. It's a skill you can learn by understanding the basics of how the sails work and how the sail controls affect them.
On this page:
What is Sail Trim?
At its simplest, "sail trim" is adjusting the sails optimally for conditions. To the novice, it looks like some intuitive dark art, and there is an element of experienced skill in knowing when and what to change. But the underlying ideas of sail trim are based on physics. You're creating a curved surface to generate maximum lift, or keeping a bag of wind filled with as much pressure as you can.
To do this, every sail has controls and adjustments, more than you may realize. The adjustments and options available vary by boat, and it's not just an issue of size. A small racing dinghy may have a lot more "tweaks" to sail control than an older cruising keelboat that was never intended to race.
Don't confuse "sail trim" with the verb "trim," as in "trim that sail." Sails are eased out and trimmed in, but sail trim refers to the overall actions of getting the sails to the optimal shape.
To learn sail trim, you need to understand how sails work, how the sail controls work, and how you need to set your sails for the conditions based on that knowledge.
How Does a Sail Work?
Sails work differently depending on the point of sail. Upwind, sails generate lift. Downwind, the sails fill to pull the boat along. There's some crossover as you move across the points of sail, where your sails are providing a bit of lift with some pull. But it’s mostly lift until you’re broad reaching.
Upwind Sails
If you've ever sat near the wing on a plane and looked out the window during takeoff and landing, you've seen the pilot trimming the wing. The shape of the wing changes to generate more lift during low-speed takeoffs and landings, and it flattens out at higher speeds to reduce drag while still keeping the plane in the air. Sail trim is very similar in concept.
Bernoulli's Principle
Bernoulli's principle states that a moving fluid, in this case air, has lower pressure than a still fluid. So wind moving across a surface will cause lower pressure across that surface. Wind blowing across the top of a chimney pulls smoke (and drafts) up a chimney because it creates low pressure at the top of the chimney. The higher the wind, the bigger the draft.
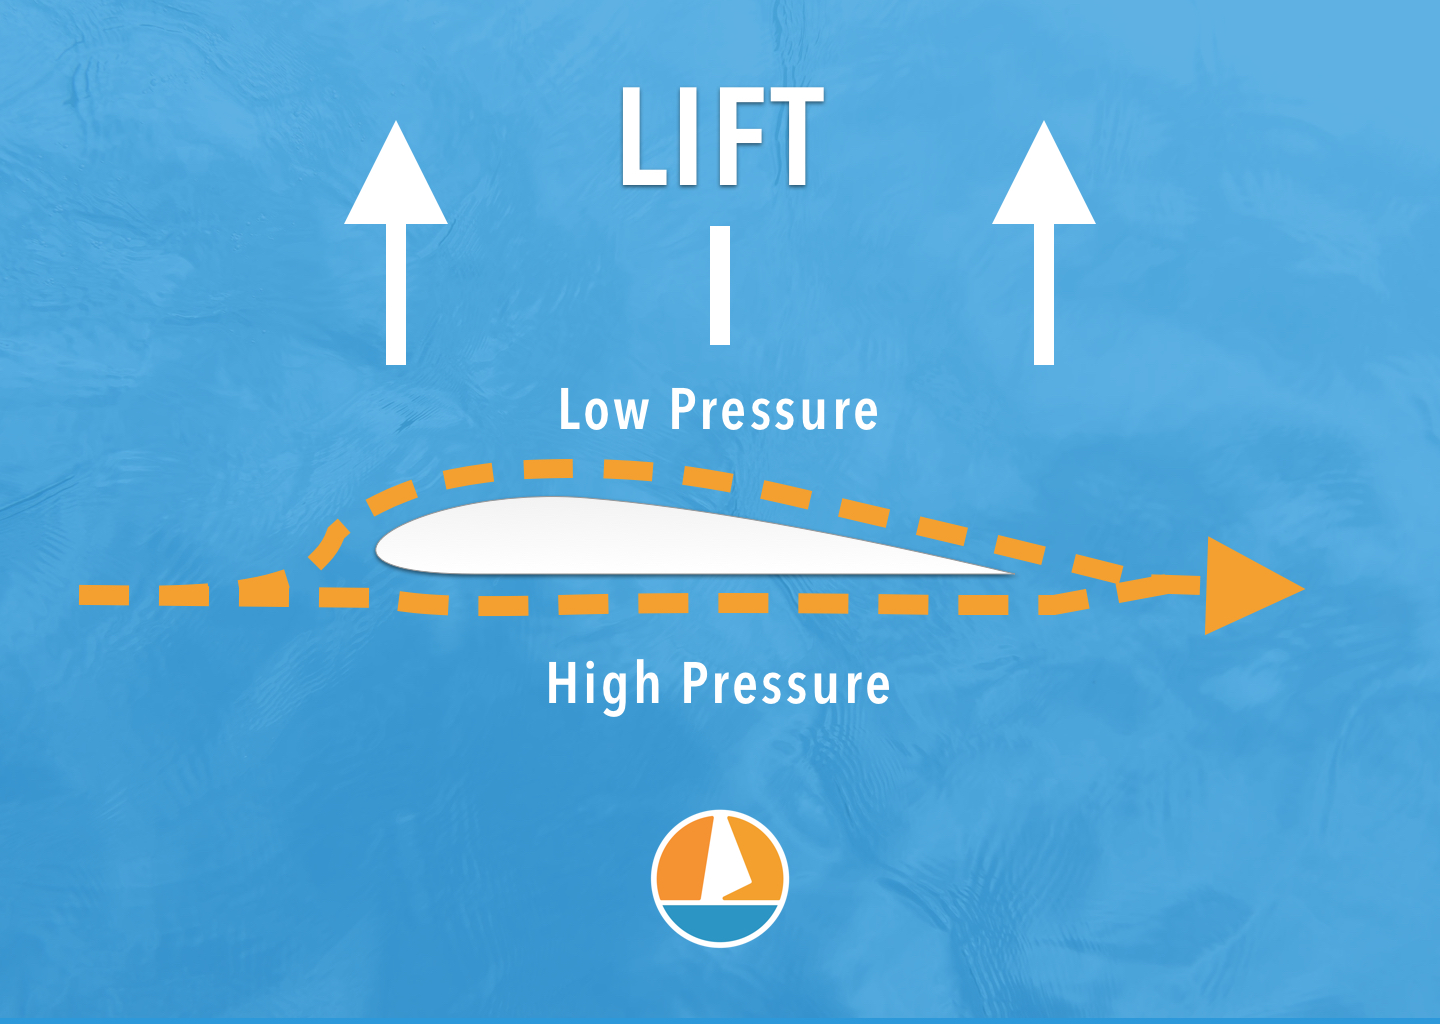
Air split and flowing across a curved surface will travel faster on the outside of the curve than on the inside. This creates a lower pressure on the outside and more on the inside, with a net force pushing towards the outside of the curve. This is the lift that puts an airplane in the air, and it is the lifting force that helps drive your boat upwind.
Lift off a Curve
The more pronounced a curved surface, the bigger the speed and the pressure differential between the inside and outside of the curve. You can see this curve in the chord of the curve (pictured). The bigger the differential, the greater the lifting force. When taking off and landing, the pilot shortens the airplane wings to thicken the chord for maximum lift.
Sails work in the same way - more curve for power, and flatter sails for speed.
Pushing Against the Keel
Without a keel, the wind pushing on the sails would just make a boat sideslip across the water. But a keel, centerboard, daggerboard, or other underwater foil pushes in the water against the heeling motion of the sails and keeps the boat upright. The counteracting force of the keel combines with the lifting force of the sails to generate forward motion in the hull.
Downwind Sails
Instead of acting as foils to generate lift, for downwind sailing, you want to catch and hold as much of the wind in the sails as you can. The operating principle is closer to a parachute than an airplane wing.
Upwind headsails are not very efficient going downwind. They're heavy and stiff, and they don't catch the wind or stay full as well. Picture a paper shopping bag (upwind) versus a plastic bag (downwind). Light spinnaker cloths and rounder sail shapes are much more efficient at catching the wind.
The mainsail is used downwind but trimmed for catching wind instead of acting as a foil. Coupled with a spinnaker, trim the two sails to catch as much wind as they can to drive the boat.
Windward and Leeward (pronounced "lou-ward") describes something by the relative position of the wind. The windward side is close to the wind, or upwind, and the leeward side is away from the wind. On starboard tack, when the wind is coming over the starboard side of the boat, windward is to starboard and leeward is to port. On port tack, this is reversed.
It may describe operations on a boat ("move the boom leeward") or anything relative to the wind, like the positions of two boats as they sail near each other.
Trim Principles Explained in Detail
Whether it's upwind sailing or down, there are a few important ideas to remember. You're trying to adjust the sail's angle of attack to the wind, optimize the sail curve for conditions, and prevent turbulent airflow on the sails.
Angle of Attack
The angle of attack of a sail is the angle that the leading edge of a sail presents to the wind. We adjust this with sail controls, and the wrong angle of attack can stall out or de-power a sail.
Sail Curve
We've discussed the curve of a sail already, and how you're adjusting it for power or speed. But you can also position the deepest draft (the chord) of the sail to affect sail performance. Unlike a rigid airplane wing, we can trim flexible sails to induce twist as well as curving. The twist in sails is used in light air to catch bi-directional winds higher in the rig, and in heavy air to spill excess wind from the sails and de-power the rig.
Turbulent Flow
The smooth flow of air across a sail is crucial for the forces described by the Bernoulli principle. If a flow becomes turbulent, it will detach from the sail and you'll lose that critical lifting force. Fluttering sails or trim with ripples and bumps will cause turbulence and badly affect sail performance.
Trimming Tools
How can you see the shape of a sail with an untrained eye? And how can you see if an invisible wind is flowing smoothly over the sail? There are tools for both, and it's important you understand their use.
Using telltales to read airflow
Telltales are your best tool to check your upwind trim and the airflow over your sails. Jibs and Genoas have one or more pairs installed about a foot back from the luff of the sail; red for the port side, green for starboard. Mainsails have several single telltales running up the leech of the sail, and may have a few on the body of the sail. Fluttering telltales show turbulent air, and you can tell how you need to fix the sail to smooth it out.
With a well-trimmed headsail, all telltales will stream smoothly. When your trim is close to right, if the inside (or windward) telltale is fluttering up, the sail is under-trimmed, so trim the sail. If the outside (leeward) telltale flutters, ease the sail until it stops.
Main telltales should stream to show smooth airflow. Otherwise, you'll need to adjust the twist (with the main sheet) or angle of attack (with the traveler) for optimal airflow.
Sail Shape and Draft Position
Draft Stripes are lines of tape on a sail parallel to the water. They're there to help you visualize the curve in the sail at various heights. If you don't have them, don't worry - you can still learn to see the shape. But the draft stripes highlight the curve of the sail for your eye so you can see the draft position and twist in the sail.
If your sail doesn't have draft stripes, they aren't difficult to put on. You may prefer them installed professionally by a sailmaker to make sure they installed straight and in the best place for reading the sail.
Sail Controls and What They Do
Every design of boat is a little different, and some boats may not have all the sail controls listed. And sometimes, even the same boats with different sails on them may have different controls. So it's important that you learn all the controls on your boat and what they do.
As you're learning trim, start with slight adjustments. Give them a little time to settle in before you make more changes, especially if you're in a heavier keelboat. Make note of your boat speed, how it feels after the change, and if your telltales are doing what they're supposed to.
The Backstay
Most boats have an adjustable backstay, whether it is a set of lines and purchase or a complex hydraulic pump. The backstay affects the curve of the mast itself, so this control affects all sails on the boat.
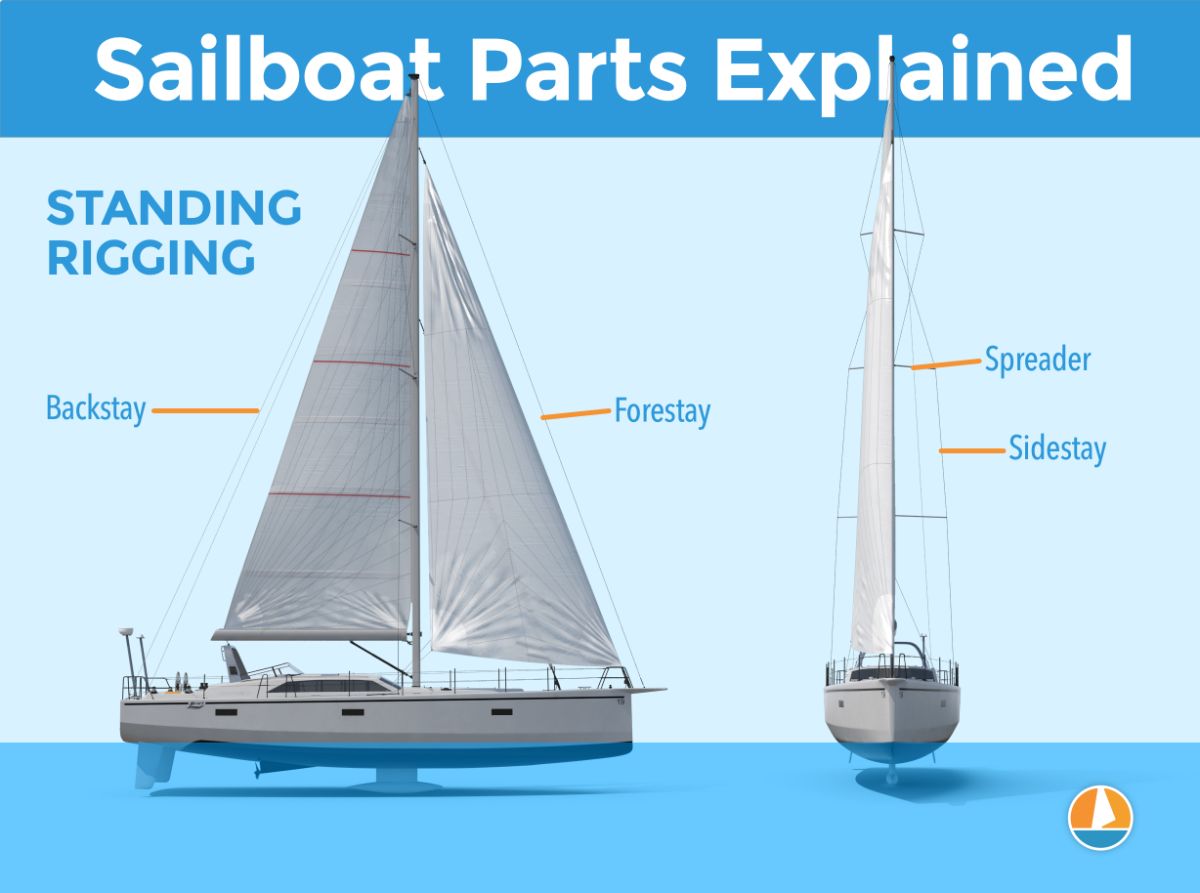
When loosened for light air, the main fills out for more power and the headstay slackens. As the breeze picks up, the backstay pulls the middle of the mast forward, de-powering the main and giving better control of the boat and reduced heeling. Adjust the backstay while sailing as conditions and point of sail demand - usually on tighter for upwind and loose off the wind.
Headsails (Genoas and Jibs)
Since headsails are usually only attached to boat at headstay, they have a few fewer controls than mainsails. Jib telltales are installed in pairs running up the luff of the sail. The lowest pair often has a window or panel to help see them. Keeping these telltales steaming is a big part of proper trim.
Sheets control angle of attack and sail tension
The jib sheets control the angle of attack of the sail, as well as the tension on the sail. Easing and trimming the sheet is the primary trim adjustment you'll make under sail.
Cars control sail curvature
Headsail car position changes the curve in the sail. Moving a car forward adds curve, pulling it aft flattens the sail out. For most upwind sailing, the car will be back, and gradually moved forward as the boat comes off the wind onto a reach.
If the car is in the correct position for the point of sail, all the telltales will flick up (luff) at the same time if you turn upwind a bit. It the top luffs first, move the car forward. If the bottom luffs first, move them back. You will adjust cars under sail as you change points of sail.
Halyard tension changes headsail draft
Halyard tension can move the draft of the sail forward or backward. Looser halyard tension for light air gives the sail more power, but for heavier breeze more halyard tension helps depower the sail and trim for speed. It's more common to set the tension when you hoist the sail, though big shifts in wind conditions during the day may require halyard tension changes.
Leech and foot cords
Most headsails have small lines running along the foot and the leech of the sail. These affect the tension of those edges, but this isn't a control you adjust often. A too-loose cord will leave a fluttering edge, over-tightening will add unwanted curve. Trim them until the edge doesn’t flutter, and so it doesn’t change shape or curl.
Mainsail controls
Depending on your rig and on how you use your boat, you may have only some of these controls, or they may be of limited usefulness on your boat. Experiment with them to see what works best for you.
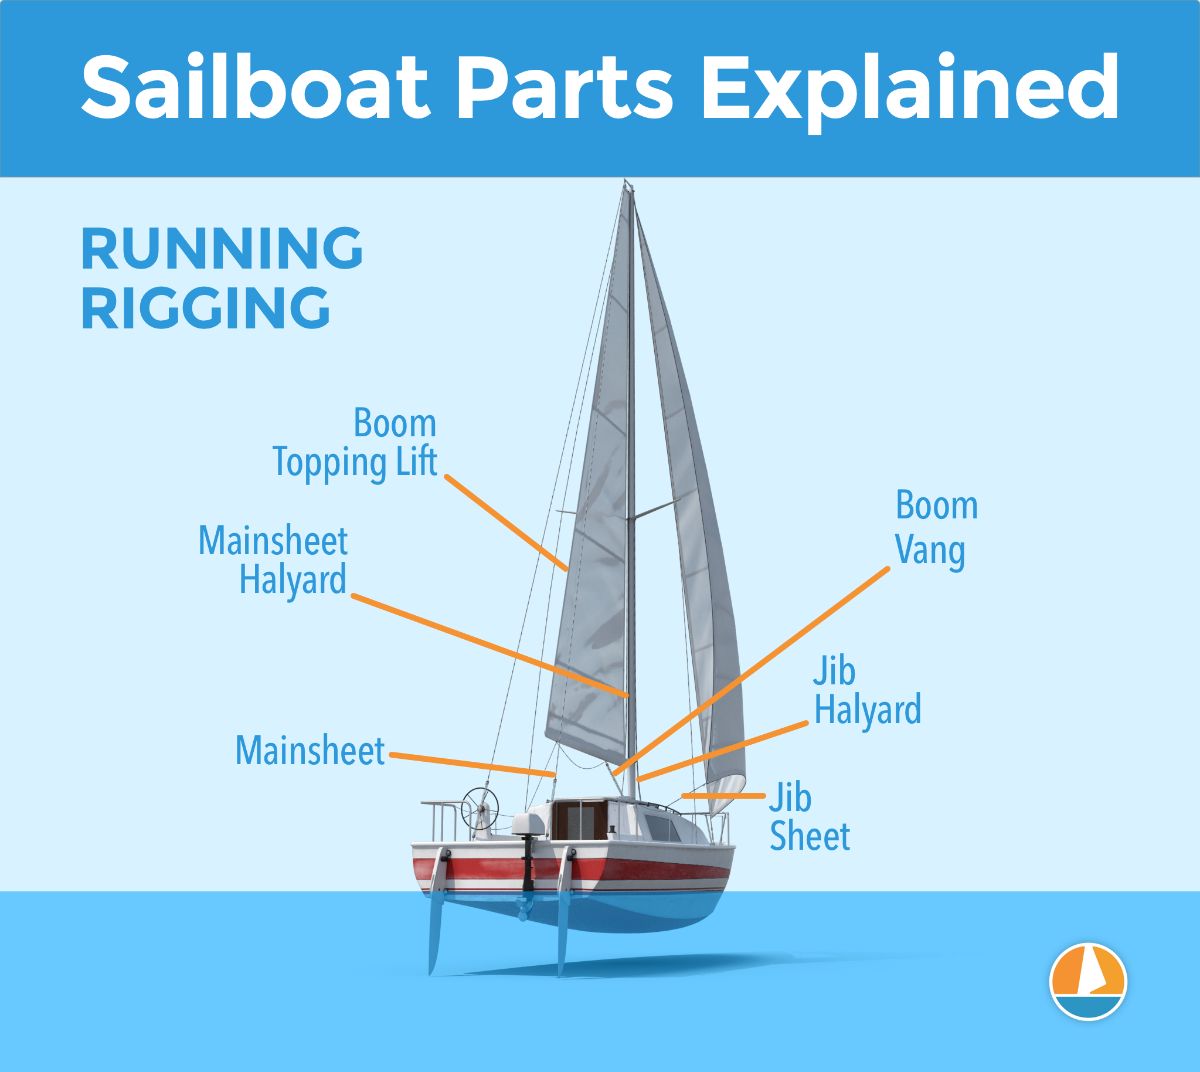
The main sheet controls the mainsail trim
The main sheet can add or remove twist in the sail and changes the angle of attack. It's useful to spill wind out of the sail to depower the rig. On boats where the traveler is nominal or less effective, the main sheet may be the primary adjustment for the mainsail and may change the angle of attack as well.
Traveler controls angle of attack
The traveler changes the angle of attack of the main without changing the twist. Some boats have large travelers attached near the end of the boom that give excellent control. But other boats may have very short traveler tracks that don't allow for much change.
How To Use Your Mainsheet Traveler (The Right Way)
Vang controls the boom
The vang keeps the boom leveled and prevents it from skying when sailing downwind. It also removes twist from the sail, or can add it to depower the sail when needed. In most cases, the vang tension is only changed a little unless you need sudden de-powering, though it may be eased for deep downwind sailing to let the main out more. Your target trim in most situations is to keep the top batten of the sail parallel with the boom.

How To Raise the Boom on a Sailboat in 5 Easy Steps
Outhaul controls curvature sail foot
The outhaul controls flatness in the lower third of the sail, and can add curve or flatten the sail. When sailing upwind, the outhaul is usually taught, and it's eased as the point of sail moves downwind and more power and less lift is needed. The outhaul can also help depower the sail in heavier air or power up the sail to punch through waves or get traction in light air. Outhaul adjustments are usually tiny; an inch of outhaul ease can add a lot of curve.
Off the wind, ease the outhaul to put more body in the main.
Cunningham
Adjusting a mainsail halyard under load is tricky, but the Cunningham allows for on-the-fly changes to the luff tension of the main. It can move the draft of the sail forward and back the same way a halyard does. Use more Cunningham trim for upwind or windy sailing and ease it off for light air and downwind conditions.
Halyard tension changes mainsail draft
Like the jib halyard, the main halyard can change the draft of the sail. With a Cunningham, you'll set the main halyard when you hoist and adjust tension with the Cunningham rather than adjusting the halyard. A good halyard tension trick is to figure out your optimal halyard tension, then mark the halyard and a point on the mast to line it with to get the right tension.
Spinnakers - Symmetrical
Symmetrical spinnakers are more complicated to fly and require more controls for the pole. The sail attaches at the top to the halyard, and to the sheet and guy.
Sheets control sail shape
The spinnaker sheet controls the shape of the sail. Spinnaker trim with the sheet is a continuous process, since the sail is very sensitive to wind direction and force changes. On racing boats, they rarely cleat the spinnaker sheet off as the trimmer is constantly adjusting the sail, and a big puff can overload the boat.

How To Rig, Set Up & Hoist a Spinnaker: Full Guide
Some boats have separate sheets and guys, but many smaller boats have one set of lines for both functions. With the pole on starboard, the port line is the sheet and the starboard line serves as the guy. When the boat is jibed, the lines switch function.
Guy controls angle of attack
The guy attaches through the end of the spinnaker pole, and positions the pole relative to the wind to change the angle of attack of the sail. Most of the time, the pole is positioned perpendicular to the wind, and the guy works opposite the sheet to hold it in place.
What makes a line the guy (as opposed to the sheet) is that it trims the pole, not the sail.
Pole down hauls / Toppers / Cars
A combination of a pole topping lift, downhaul, and track adjusts the spinnaker pole height off the deck. While combinations vary, trim the pole parallel to the water and perpendicular to the wind. The pole is raised in light air for more power, and lowered for higher winds.
Spinnakers - Asymmetrical
An asymmetrical spinnaker attaches to the boat at two fixed points - the halyard, and the tack line on the bow, usually on a sprit or pole. Because there is no spinnaker pole, there are fewer adjustments and controls.
Sheets control angle of attack and tension
The sheets on the asymmetrical control the sail, there is no guy or pole. It controls angle of attack and tension.
Bowsprit / Tack line
Adjust the tack line to set the sail height for the wind strength. It's trimmed in tight to the sprit for heavier breeze and eased to set the sail higher for light air.
Upwind Sail Trim
The primary aim for upwind sail trim is to keep a smooth sail with the right amount of twist for power. A well-trimmed upwind sail will be smooth with no flutter in the middle or edges, and the tell-tales will all stream smoothly. Trim for hard upwind angles will be the tightest, and you will ease the jib sheet and eventually move the jib car as you sail off the wind onto a reach.
When you start to trim for upwind, make sure you have your boat pointed about forty-five or fifty degrees off the wind. If you are too close to the wind, you won't be able to fill the sails to trim them. Once you have rough trim with the telltales streaming, you can try pointing up more and adjusting.
Remember when following these steps that every boat is different. Some boats will trim a little more loosely upwind, or want the sail controls set differently from others. It's important to experiment with your boat to get the best trim. You should feel it when she's "in the groove" and trimmed and sailing well, and your instruments will show it.
As you learn to trim your boat, make notes about your sailing angles, the sail control positions, and how the boat sails and feels. When you get the trim right, you want to do it again next time! Racers make marks on the deck and rig for optimal halyard tension, car positions, and other trim points once they know them. While you don't need to mark your boat up with markers or tape for casual sailing, take a few pictures of the proper trim positions or describe them in a log once you find them.
Close-hauled / beating
Close hauled sailing has your sails trimmed in as tight and close to centerline as they will ever be. Be careful not to over-trim. Proper trim is not "everything in all the way tight," it’s closer to “everything in not quite as tight as it can go.” It's possible to over-trim and stall your speed, so don't "bake" the sails by sheeting too much.
Mainsail
Center the boom with the traveler, and trim in the sheet to take most of the curve out of the sails except in very light air. For the other controls, start in these positions. They aren't absolute. You will need to adjust them to get your telltales streaming.
- Backstay should be on, with more tension for higher breeze and very little for light wind.
- Outhaul is trimmed all the way. Many booms have a band marking maximum clew position, and this is your starting point for upwind trim in moderate air. For lighter breeze, ease the outhaul a bit.
- Cunningham is pulled down tight except in very light air.
- Traveler - center the boom, though some boats may prefer it slightly to leeward.
- Mainsheet - trim the mainsheet most of the way in, though don't pull the boom past parallel to the deck. In very light air, you will want to ease this a bit.
- Vang - Since the mainsheet is trimmed in, the vang has little to do to keep the boom down. Trim to keep the boom parallel to the deck if the sheet is eased, but it will be under little tension itself going upwind.
If you've set it well, all the telltales should be streaming. If the top telltales are fluttering inside the sail, tri m the mainsheet or the vang a little until they stream. But if they are pulled forward out of sight, ease the main a bit or move the traveler more to windward.
In very light air, the top telltale may never trim well and all of your main trim will have to be looser.
Headsail
Setting the jib up for different points of sail is mostly about the car position and sheet trim, since there aren't as many controls to worry about. It sounds easy, but it's usually the sail we end up fiddling with and adjusting the most. For upwind sailing, it's important to trim the sails right then sail the boat to the wind.
Once your sail is trimmed, your telltales may still flutter and stall, but that's because the wind changed or you came off the upwind course while driving. If the inside telltale flutters, you're too close to the wind. If the outside telltale flutters, you're too far downwind. As the wind shifts and oscillates, you will need to constantly adjust your heading to keep the telltales streaming, and you can't do that unless the sail is trimmed properly.
For headsail sail trim upwind, begin with the controls in these positions and adjust accordingly.
-
Halyard tension in average conditions should be tight enough so there are slight scallops in the luff of the sail. Halyard tension moves the draft of the sail forward (tighter) and back (looser), and your goal is to put the draft about 1/3 of way from the front of the sail. For lighter air, you want less tension and more for heavier air.
-
Headstay sag is important for controlling the draft depth and power in the sail. In light air, more sag will give you better power and point, and less sag in heavy air gives better speed. For most boats, backstay tension controls headstay sag, though some boats have headstay adjustments. The backstay adjustments you make for wind conditions affect both jib and main for better sailing.
-
Jib Cars should be aft. There's no absolute position to start because every sail is different. Most boats have a track long enough to handle large, overlapping headsails, so the car may go much further aft than you need for a smaller sail. Start with the car about 2/3 of the way aft, and adjust the position until all the jib telltales luff at the same time.
-
Jib Sheets will be trimmed so the sail is tight. This may be a lot tighter than you expect, you may crank the sail in almost to the shrouds. But don't over trim, the usual upwind position is "just a little under all the way in." And don’t pull the sail onto the shrouds!
To trim the sail, start sailing upwind with the boat set for upwind and the headsail fairly trimmed in. Sail as close to the wind as you can, while trimming in the headsail until you see both the lower telltales stream. If all sets are streaming, you're done. But most likely, you'll need more adjustments.
If the bottom telltales are streaming but not the top, you'll need to move the jib car forward. If the top streams, but not the bottom, move the car back. You may need to adjust your sheet tension as well.
Once you've got the car position close, make one more check. Head the boat into the wind slightly until a telltale breaks. If you are well trimmed, all the telltales will break at the same time. Move the car forward if the top breaks first. If the bottom breaks first, move the car back.
Once you are trimmed, look at your settings. Most jib cars have screw holes you can count, some may have numbers on them. You can even draw a line at the car position on the track with a Sharpie (it will wear off over time) or on the deck with a pencil. But the point is to record and memorize that ideal car position so you reset it again without more trial and error.
Reaching
Sail trim when cracking off a beat onto a close reach is pretty easy - gently ease both sails to keep the telltales streaming. But once the wind moves back, you need to make more adjustments to the sail trim.
As the wind moves back, you'll want to change the angle of attack to the wind while adding more curve to the sails to keep them full and powerful. That translates to easing the jib and main sheets out, while edging the jib car forward and easing the outhaul a little.
Beam Reach
The classic instruction to trim on a beam reach is to "ease the sails until they flutter, then trim them in." This is a good starting point for the sheet positions on the sails, but you will want to check the other controls for more fine trim.
Specifically, check that ALL your telltales are streaming. If you're cracking off from close hauled, your top telltales are probably fluttering a little, and the jib car will need to go forward.
How do you trim a sail for broad reach?
For broad reach trim, you'll want a lot more curve in the headsail so move the cars forward. As you head on deeper reaches, the driving shifts from pure lift (like upwind sailing) to some of pushing on the sails at the deepest points. If the mainsail blankets the jib, you're at the edge or reaching and moving the cars forward can only do so much.
One advanced technique for deep-reaching is barber-hauling, or running a second jib sheet outside the jib cars and railing and putting the sail load onto that sheet. This gives a much better shape to a broad-reaching sail. If you never plan to use a spinnaker, it's an excellent skill to master.
Downwind Sail Trim
To visualize downwind sail trim, imagine holding a plastic shopping bag open in front of an oscillating fan. As the fan moves across the mouth of the bag, the bag will fill partially until the fan is pointing straight at the bag. When the breeze from the fan is pointing directly into the mouth of the bag, the bag will be completely full and pull against your hands with the most force.
This is the core of what you're trimming for sailing downwind - keeping the wind pointed into the sails to fill them as much as possible.
Sailing downwind, you will ease most sail controls to get full, rounded sails. Also, the apparent wind sailing downwind is much lighter, so there is less wind to fill tight sails so you're aiming for a baggier shape to catch every bit of breeze.
Jib and Main
If you will not fly a spinnaker, you can still sail downwind with your jib and main more efficiently with a few extra steps. Your goal is to keep the headsail full to help the mainsail.
First, your rig should be loose, so ease the backstay. Also, ease the outhaul a fair amount, then ease out the mainsheet until the mainsail is almost to the spreaders. Many mainsails have chafe patches where shrouds may touch the sail to protect the sail from chafe. Don't put the main hard against the rig even if you have these. They're for incidental contact protection, not to allow you to run with the main pressed and chafing against the rig.
Jib trim is more problematic, as the mainsail will blanket the headsail and it will be hard to keep full. A collapsed jib does nothing to move the boat, and constantly filling, collapsing and flogging the jib may damage the sail and wear it prematurely. There are techniques to stop a collapsing down wind headsail - including using a whisker pole to leeward, or sailing wing-on-wing (or wing-and-wing), and wing-on-wing with a whisker pole.

To sail wing-on-wing, start sailing deep downwind, then pull the jib through the foretriangle to the windward side of the boat. Trim it until it fills. Keeping a winged-out headsail full without a pole can be very difficult, and sailing deep downwind risks an accidental jibe, so using a preventer with the main is a good idea.
For more effective wing-on-wing sailing, put the spinnaker pole (or dedicated whisker pole) up with one end on the mast, and the upwind jib sheet through the outboard end of the pole. Now the pole will hold the foot of the sail open so it can't collapse. Trimming the sail will move the pole back, and you want to keep the pole perpendicular to the wind to keep that sail full and as close to parallel to the water as you can.
The fastest wing-on-wing sail direction is sailing slightly by the lee, which is with the wind slightly past the centerline of the boat. With the wind a little by the lee, the main will be not quite on the edge of jibing, but you'll be able to keep the jib very full and effective. As you learn this technique, rig a preventer to the main to stop an accidental jibe. These are dangerous and can hurt people and damage the boat.
A whisker pole is any pole used to hold out a jib. It has jaws on the outboard end to attach to sail sheets. If your boat has a spinnaker pole, you can use it as a whisker pole. A spinnaker pole is a fixed length, so it may not fit well with smaller jibs. An adjustable whisker pole is a helpful tool if you don't plan to use a spinnaker, since you can set it to different lengths for different sails and wind conditions.
Many new sailors find wing-on-wing to be stressful and difficult because of the constant danger of an accidental jibe. Another approach is to put the whisker pole on the leeward side to keep the sail full on the same side as the main. You won't be able to sail as deep downwind or by the lee, but it is a less stressful way to force the sail full and keep it from flogging.
Spinnaker
As we learned with the bag and fan example, your primary aim is to keep the wind flowing directly into the opening of the sail. The techniques are a little different for the two types of spinnakers because the sail controls are very different.
The rig should be loose, with the backstay eased. On the mainsail, ease Cunningham completely off, ease the outhaul, and ease the sheet until the sail is near the spreaders. Keep the vang on so the boom stays parallel to the water.
When you ease the sheet on a full spinnaker, eventually the luff of the sail will start to curl and flutter a little. This luff curl is the key indicator on all spinnakers that your sheet trim is in the right place. Trimming the sheet means easing it until you see just a little curl, then easing it to stay on the edge of that curl as the wind changes.
Asymmetrical Trim
You only have two sail controls - the tack line and the sheet. The tack line may be adjustable on your boat. If it is you will ease it for light air to add power, and trim it tight to the bowsprit in heavier conditions or for higher reaching angles.
An asymmetrical spinnaker is not designed for sailing deep downwind, and it will not be fast to sail too deep because it isn't efficient. Fast downwind progress with an asymmetrical comes from sailing hotter broad reaching angles at higher speeds. This lets you get downwind much more quickly than jib and main sailing. Even though you sail further because you aren't headed far downwind, you get there quickly anyway because of the increased speed.
To trim your asymmetrical spinnaker, set the sail and fill it while getting onto a broad reach. Ease the sail slowly, keeping your eye on the luff of the sail. Ease it until you see the luff curl - that lip curl is the proper trim for the sail.
Because you aren't sailing dead downwind, you may need to trim your main sail in to draw for higher-reaching angles. Don't leave it eased to the shrouds and forget about it, check shape and telltales to keep it full.
Cruising sailors may lock off the spin sheet and only make adjustments for big wind shifts, or turn the boat to keep the sail curled. Racing sailors constantly trim the spinnaker for the optimum position and work closely with the person at the helm to keep the boat at the hottest angle with the sail full.
Symmetrical Trim
Trimming a symmetrical kite involves trimming both the sail and the pole. The pole lets you keep a firm grip on the opening of the sail, and you can keep the opening of the sail perpendicular to the wind for the maximum draw.
Set the pole parallel to the water on the windward side. Adjust the pole car on the mast of needed, and set the topping lift and pole downhaul to keep the pole parallel. For lighter air, a higher pole gives more power, but a lower pole can give more speed in heavier conditions.
Trim the guy to keep the pole perpendicular to the wind. If you're sailing deep downwind, the guy should be all the way back with the pole nearly to the shrouds. But for tighter reaching in light air, ease the guy to let the pole travel forward to stay perpendicular to the wind.
With the pole perpendicular to the wind, slowly ease the sheet until the luff of the sail on the windward side curls. That bit of lip curl is your trim target, and the spinnaker trimmed should keep easing the sheet to keep that little curl in place.
When you are sailing deep downwind, ease the main as far as you can to catch as much wind as possible, though if you head up to a reach you may need to trim it in a little.
Trimming for Conditions
Sail trim isn't an absolute formula. You can't just put the car in absolute position X, ease the sheet out exactly Y inches, and have the boat trimmed perfectly every time in all conditions. Flakey winds, choppy seas, the direction you're sailing and even why you're sailing affect how you can best trim your sails for that moment. It sounds a little overwhelming, but it's also part of what makes sailing fun and challenging.
Trimming your sails for speed
Trimming for speed usually means flattening the sails and reducing the curve and twist. The boat is moving, and you want it to move faster, and flatter sails add less drag. In moderate conditions where you can sail for pure speed, flatten out those sails.
Trimming for heavy air
Heavy air can be fast and fun, but it can also feel out of control as the boat heels like mad and the foam flies. Your first option for heavy air is to harden the backstay, it will depower the main and jib a bit and get the boat more under control. Most controls will need to be tight to depower the sails and keep them fast.
If the wind is too high, consider reefing the sails or changing to a smaller headsail. And when sailing upwind, you can pinch the boat a little too high, which will slow you down, but keep the boat more under control.
Trimming for light air
Over-trimming your sails in light air will almost stop you near dead in the water. For light air sailing, everything needs to be looser than usual, and you need to add twist and curve to sails for power. Ease off sail controls all around and set your sails more for power than speed.
Trimming for waves and chop
Rough water slows down your boat. It does this in several ways, from slapping the hull backward when you hit a steep wave to backfilling and fluttering your sails as you get tossed about and pushed from your heading.
To keep your boat moving forward in rougher water, you need to trim for power since the boat will have to keep accelerating back up to speed. So a little easing of the sails and an increase in twist can help you keep the speed up as you bounce around.
Controlling the Boat
The scariest sensation for new sailors can be a fully powered-up boat. With the breeze on and the sail trimmed in, the boat will dig in and sail fast. But that feels on the edge of control sometimes, and it's not always comfortable. And it really can be on the edge of control in some conditions. So you need to know how to keep the boat in hand and comfortable.
How do you slow down: de-powering sails
In most cases, easing a trimmed sail will depower it. But there are a few other ways you can slow the boat and rein things in, including:
- Sailing upwind or on a close reach, pinch the boat up into the wind, which has the same effect as easing the sails off. It relieves pressure on the sails, but you don't want to flog your sails or it will shorten their life.
- Sailing downwind or on a broad reach, point the boat downwind. It will decrease the apparent wind you feel and lighten the loads. Don't go too far and jibe.
- Use more backstay, which typically flattens the main and jib and takes away power.
- Reef the sails. Furling sails can be partially rolled, or the main can be folded and tied on the boom. You should know how to reef your sails for safety.
- Change headsails to something smaller if you have it.
How to reduce heel
"Flat is fast" are words to live by for racing sailors. A deeply-heeled boat drags more in the water and is slower. For cruisers and casual sailors, it's also uncomfortable to have the rail buried all the time, and it frightens new sailors and guests not comfortable with sailing.
De-power your sails
De-powering your sails is one easy way to reduce heel. You'll sail slower, but if you're not racing or trying to hit a deadline like a tide shift or sunset, speed isn't so important. The easiest way is to just pinch up a little and sail higher and slower without luffing the sails.
Sit on the other side of the boat
Besides de-powering the sails, you can flatten the boat by moving weight on the windward side of the boat. Racers do this by seating crew up on the windward rail. But even sitting everyone on the upwind side of the cockpit in a small boat can make a difference.
Did you find the answer to your specific question?
👍 14 👎 6
Comments
Bill Powell
where is the “cheat sheet?”
thanks.
Robert Sherwood Winders
One of the better articles I have read. It tells me a little theory, what the part is , when to use it , and how to know when you did right . Sweet and to the point. To the new sailor I need to know how to make my boat sail and basic must knows. Over time and with practice I will learn more in-depth theory.
thanks
JakeSails
Thanks! Well said. Much appreciated.
Leave a comment